
Getting Data to Rowsandall.com
With the recently improved Upload page on https://rowsandall.com, it becomes time to list all the options we have to get our data on the site.
But first, watch the short video I made of the Upload page.
So, what options exist?
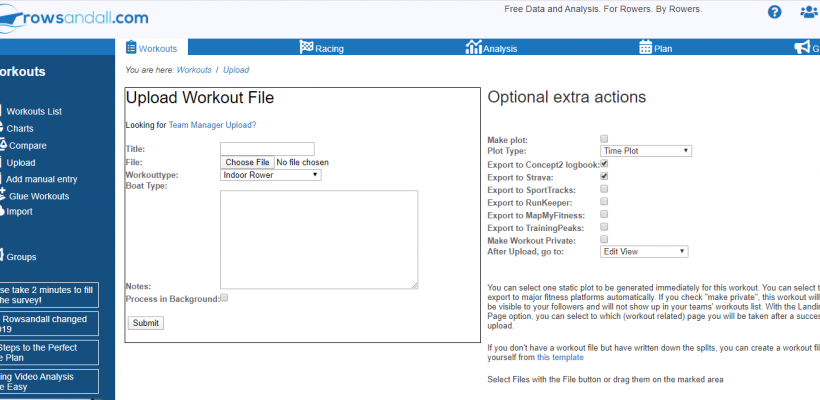
Upload Page
The address of this page is:
https://rowsandall.com/rowers/workout/upload/
You have to be logged in to Rowsandall to access it. There is also a link to the page near the top left of every page on the site.
As the video shows, you can either select and browse to get to your file, or you can drag and drop from your file system. Hit Submit, and off you go. Easy.
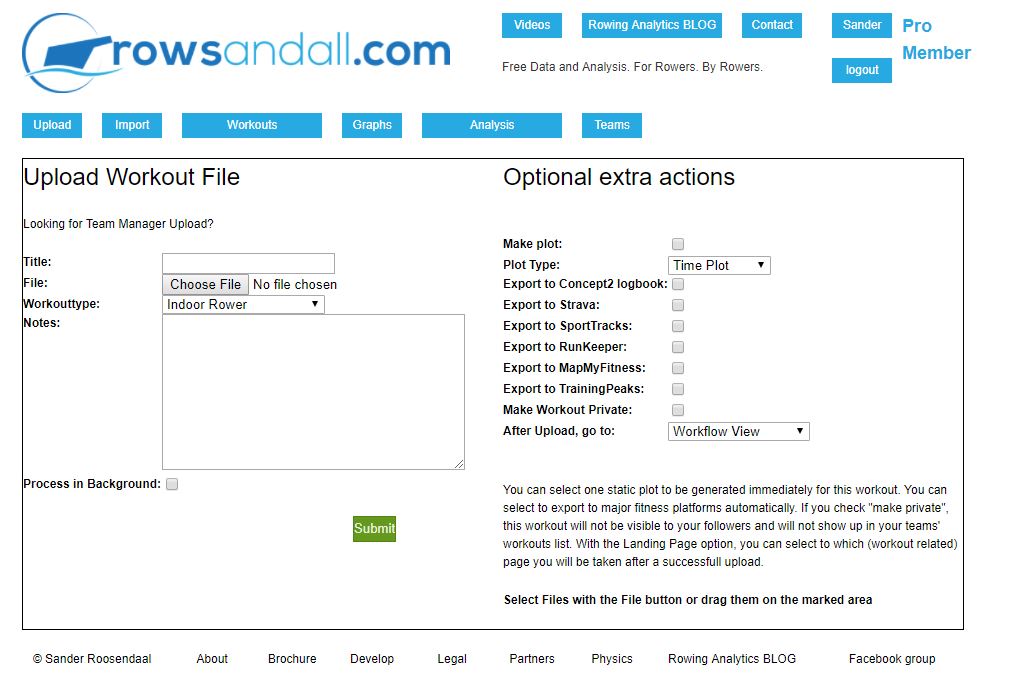
It is indeed that easy, but there are a few things that are good to know. The Upload Form has two parts. On the left part of the form you have the workout name, workout type, and the notes field, as well as the “background upload” check box (more about that below). This part of the form governs the workout itself and how it is uploaded to the site.
The right side of the form allows you to select actions that are performed after your workout has successfully uploaded to the site. You can make a static chart, synchronize your workout to one or more third party platforms, and make the workout Private.
Finally, you can choose where you want to go after the workout was successfully uploaded. You can either choose:
- Edit View: The page where you can change the workout time, duration, distance, notes, and other properties of the workout
- Workflow View: The new Workflow View. See this article for a description of the Workflow feature.
- Upload Another File: You stay on the Upload Page because you want to upload another file.
All these options are “sticky”, so as long as you don’t log out from the site, the site remembers the settings you last used.
On iOS and Android, you can also access files from Google Drive, Dropbox, iCloud and other cloud storage sites. Working with files from these sources is exactly the same as uploading files from your desktop.
Background Uploads
That little checkbox on the bottom left of the Upload Form, called “Process in background” does the following:
Instead of processing the workout immediately, it puts the workout in a queue to be processed later.
This is particularly useful for large file sizes, long rows, and for TCX files, which process slowly. Instead of having to wait for the processing to be done, you are returned to the Upload page and you can continue to do other work.
Within 5 to 10 minutes, you will receive an email with a link to your workout. If you have checked synchronization or a chart in the upload options, these will be done once you get to the workout.
If you don’t receive an email within 10 minutes, drop me an email and I will fix the bug as soon as I can.
Upload by email
The “background uploads” queue can also be reached by email. The process is very simple.
Send an email to workouts@rowsandall.com, with the following:
- The From address is identical to the address that you registered with at rowsandall.com
- Your workout file(s) is/are in the attachments. It is OK to attach multiple files, or to attach a ZIP archive containing your workout files.
- The email Subject is the name you want to give to the workout
- The body of the email may contain some magic commands (see below).
So all you do is send your email, and within a few minutes your workout will be on Rowsandall.com. If you have checked “Receive Notifications” in your user settings, you will get a confirmation email with a link to your workout.
As many rowing apps (CrewNerd, BoatCoach, Painsled, NK mobile app) allow you to send data per email, this is a great way to get your workout in the processing queue before you take a shower. Once you are done showering, the workout is already on the site for you to work with, thus eliminating the process of booting up your computer, downloading files to your desktop, and then uploading them to rowsandall.com.
Email Magic Commands
As you don’t have to Extra Upload Options form at your disposal in the email, the site has an option to read them from the email body.
The easy way
The easy way is really easy, but it may not always lead to the result you want. The parser just reads your email, line by line, and if the line starts with something like sync or synchronization or export, it scans the line for export related words. The recognized words are
- C2, logbook or concept2 for the Concept2 logbook site
- trainingpeaks or just short tp for TrainingPeaks
- strava for Strava
- sporttracks for SportTracks
- RunKeeper or rk for RunKeeper
- mapmyfitness for MapMyFitness
- underarmour or ua for UnderArmour
You can put as many fitness sites as you like, for example:
sync c2 strava and mapmyfitness oh and also trainingpeaks
Similarly, if the line starts with plot or chart, the parser scans the rest of the line for one of the following:
- pie creates a Pie Chart
- distance creates a Distance Chart
- time creates a Time Chart
This part makes only one chart, so if you put more of them in the same line, you may end up with a different result than you expect. So here are a few valid examples:
chart time
or
plot pie
or
chart distance
Lines starting with private, privacy or any word starting with priva tell the parser to do something with the Private setting of the workout. If the rest of the line contains one or more instances of the following words:
- false
- none
- no
the workout will remain public. In any other case, the parser assumes you used this keyword to indicate that you wanted this workout to be a private one. So to set your workout to private, you can do one of the following:
private yes
or
privacy hurray!
or
private
To keep your workout public, just don’t mention the word private at the beginning of any line. If you really want to be explicit, you could
private false
or
privacy no
Lines starting with workout or workouttype tell the parser to set the workout type. The default value is rower (Indoor rower), but valid options are:
- slides (indoor rower on slides)
- skierg (SkiErg)
- dynamic (Dynamic Indoor Rower)
- paddle (Paddle Adapter)
- snow (On-Snow)
- water (On-The-Water rowing)
- coastal (Coastal rowing)
- other (Other)
So valid commands are for example:
workouttype water
or
workout slides
Finally, lines starting with boat or boattype tell the parser to set the boat type for on-the-water rowing. Valid options are:
- 1x (default)
- 2x
- 2-
- 4x
- 4-
- 8+
Correct, the coxed pair and coxed four are missing! Let me know if you have a need for them. So, for example, you can write:
boat 8+
or
boat 2-
As said above, while this method is really easy, it is not 100% reliable. For those who want full control, there is the geeky way to do things, but it requires that you learn YAML. Don’t worry if you are not interested in using YAML. By playing around with the words given above, I think you will be able to figure out to get the result that you want really fast.
The Geeky way
Are you still reading this? Great, so we’re between geeks now. The reason I offer this stricter parsing of your email is that it is easier to introduce new commands and options in this way. So, I am basically making you work a little harder, to make it easier for me.
The idea is that you write something like
sync:
– C2
– SportTracks
chart: distance
private: yes
workouttype: water
boattype: 2x
…
In the body of your email and rowsandall.com will automagically sync your workout to Concept2 and SportTracks and make a static chart with distance on the X axis.
The above example is in YAML. YAML (Yet Another Markup Language) is a markup language that is supposed to be human readable. Still there are some syntax rules. Here is a good link on YAML:
Correct YAML is parsed well by rowsandall.com, but there is one caveat:
If your email body contains bits that are not conform the YAML spec, for example standard signatures and such, the parser may not be able to process the entire body.
The solution is to put the bit that you want to be processed between
(three dashes) and
…
(three dots). This is a YAML quirk that allows you to indicate the start and the end of the special message.
Currently, the following YAML commands are recognized as commands:
sync:
synchronization:
These should be followed by a list of one or more names of supported sites:
- C2
- concept2
- logbook
- tp
- trainingpeaks
- strava
- st
- sporttracks
- rk
- runkeeper
- ua
- underarmour
- mapmyfitness
Here C2, concept2 and logbook are all mapped to the Concept2 logbook. Similarly, tp is shorthand for Trainingpeaks, st is shorthand for SportTracks, rk for RunKeeper, and ua for UnderArmour.
If you want to be really geeky, you can also write this as:
sync: [c2,st,tp]
Which will synchronize to the Concept2 logbook, SportTracks and TrainingPeaks.
The plot options work as follows
chart: time
plot: distance
chart: pie
You can use chart or plot. It is the same. The possible plot types are currently
time
distance
pie
You should have only one plot. It is not currently possible to add a list of charts to be made. This is done to mimic the behaviour of the upload form as much as possible, but it is possible that I change this behavior in the future.
Finally, you can set the privacy of your workout with
private: yes
privacy: no
Any word starting with priva is recognized as setting the privacy. Possible arguments are:
no
false
None
In this case, if the argument is not recognized as something close to false, no or similar, the parser assumes you wanted to say yes or true.