
This manual describes functionality for Rowsandall members on the “Self-Coach” plan. If you are a member of a team, you have some of the functionality described here, but creation and editing of sessions is limited to your coach. If you are on the Coach plan, please refer to the Coach manual.
This article is a complete rewrite of Training Planning – Manual for Rowsandall.com taking into account new functionality developed since then.
The benefit of creating training sessions on Rowsandall is that you have both the plans and the record of what you actually did in one place. By linking the two, you can compare plan vs execution, which will give you insights to use for planning the next season.
What will you learn from this article?
- Use Rowsandall.com to plan in your training sessions
- Creating a library of your favorite sessions, and using the library to create training plans
- Specify training steps for a session
- Tracking progress versus your planned sessions
Create Training Sessions
A “Training Session” or “Planned Session” is a description of a workout that you intend to do. This is what you have planned in advance, as opposed to the actual records of when you did the session.
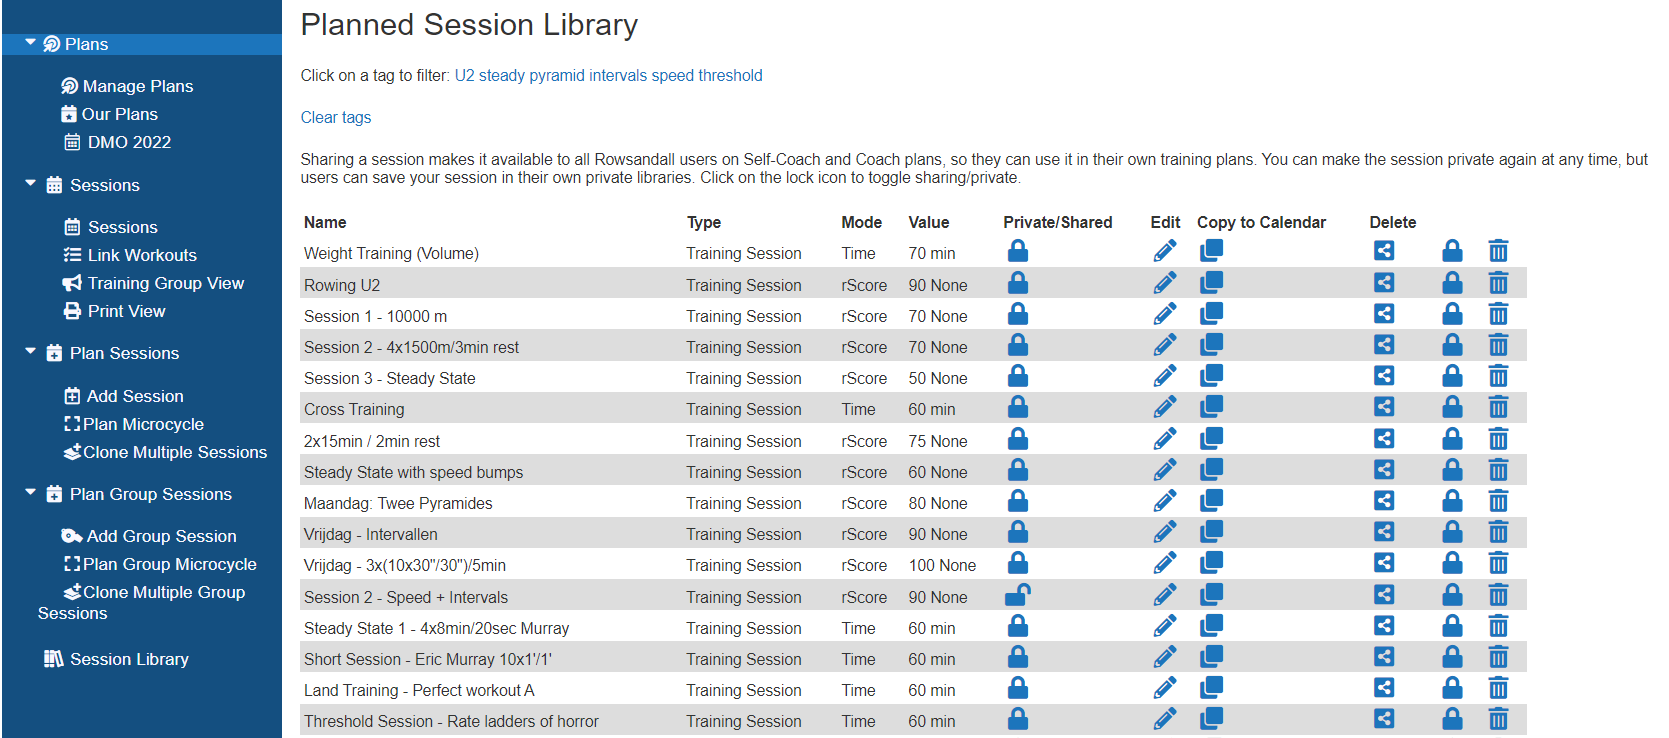
The link to the Plan part of Rowsandall.com is on the top menu. When you open the Plan page, take some time to click open the sub menus on the left and familiarize yourself with the contents:
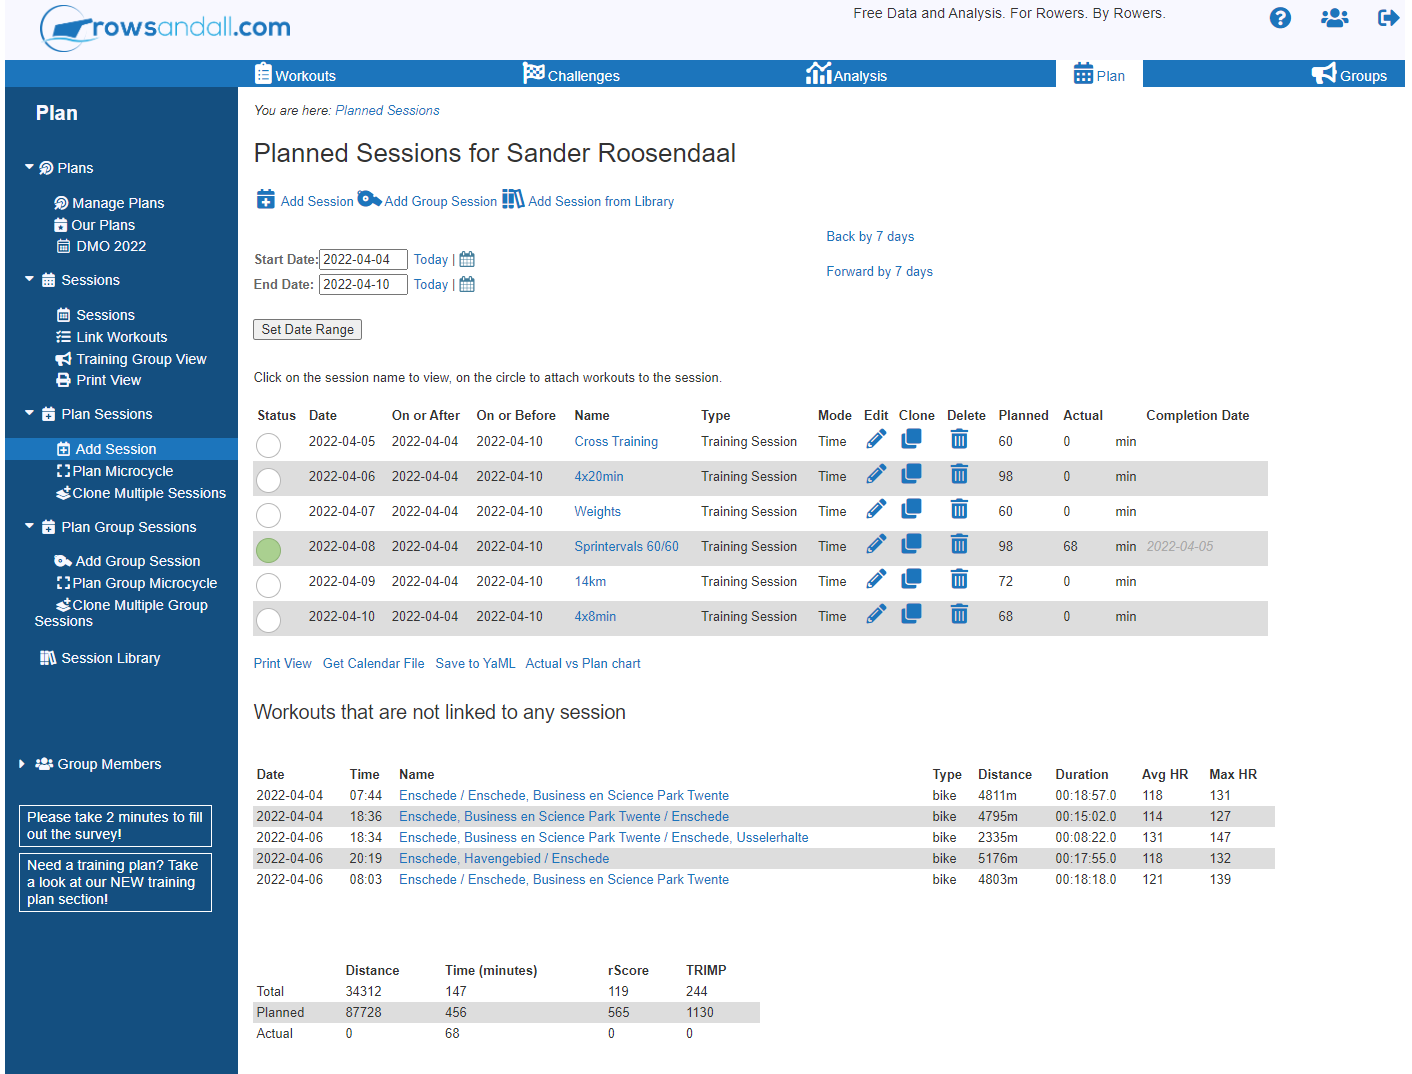
In the screenshot from my account you see a lot of planned sessions already. If you’re starting out, that spot will be empty. Let’s create a new Session (using the “Add Session” link from the “Plan Sessions” menu on the left.
 I will give a complete explanation below, but for most users, the short summary is:
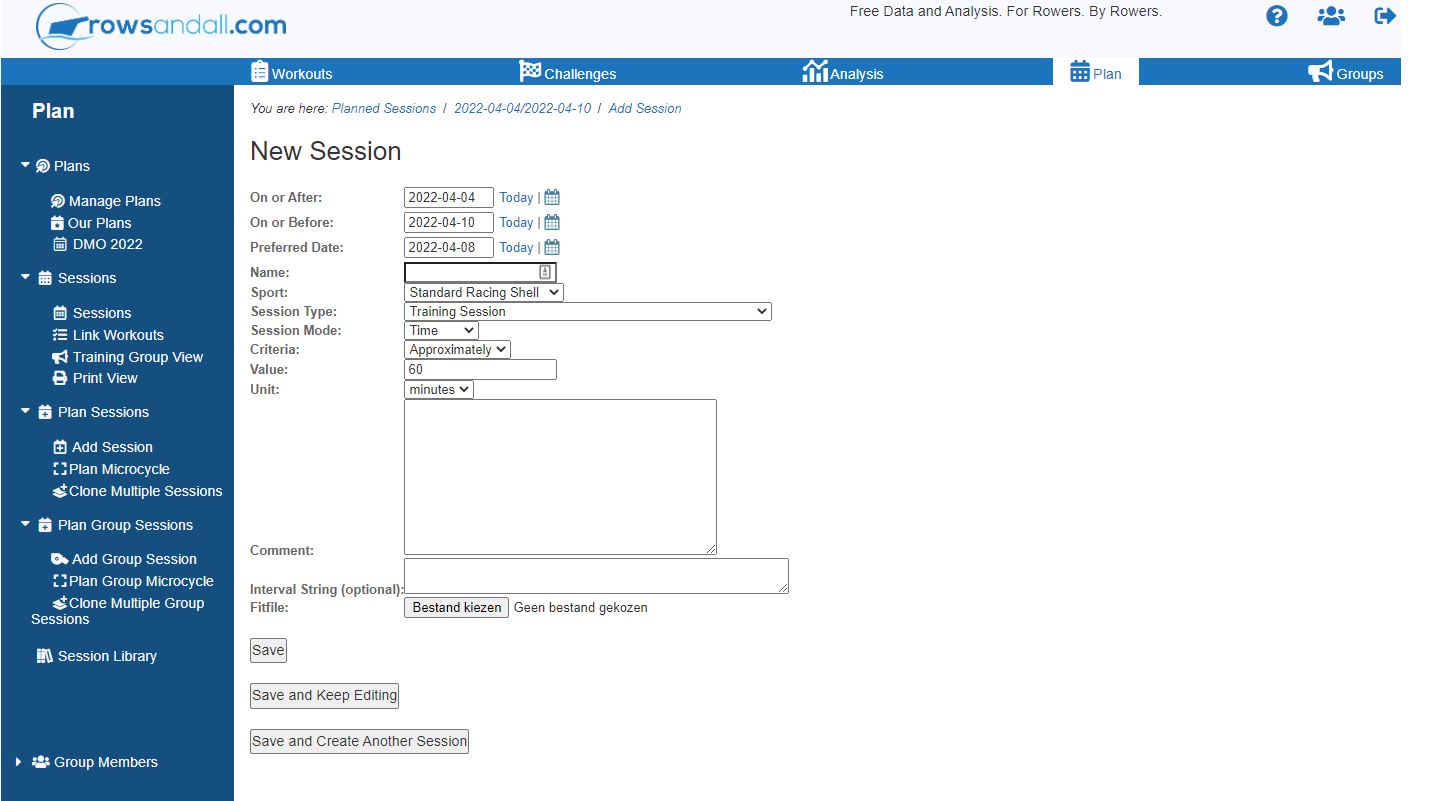
- Set On or After to the first day of the week, On or Before to the last day of the week, and Preferred Date to the day on which you plan to do the workout.
- Give the workout a descriptive, short Name.
- Select Sport
- Set Session Type to “Training Session”
- Set Session Mode to “Time” and fill in the estimated time in minutes under Session Value
- In Comment, write a more verbose description of the session, if it is not clear from the name.
If you know what TSS or TRIMP is (measures of session load), you can also plan by those. After experimenting with this, however, I personally stick with “Time” because it is important to know if a session fits in my lunch break.
Once you have created a session, you will see it on Rowsandall.com under Plans.
In this list, you can do the following:
- Link workout records to the session by clicking on the white or colored circle. The colors give an indication of whether you already have records linked, and how you performed.
- See the session by clicking on its name
- Edit, Clone or Delete the session using the little blue icons. Edit and Delete are obvious. Clone creates a new session that is identical to the original one. This is easy when you are, for example, planning multiple weights or steady state sessions in a week.
There are more exotic session options. If you’re not interested in them, you can skip to the next section. If you are curious though, here is the complete description:
- On or After: The first date at which you can do the planned session.
- On or Before: The last date at which you can do the planned session.
- Preferred Date: The preferred date for this session. Playing with Preferred date, On or After and On or Before allows you to create some flexibility in your program, to account for work, family or life in general interfering with your training schedule.
- Name: The name of the session. Best to give it a descriptive name, like “Sprints 8x500m” or “Steady 12km”
- Sport: The preferred sport for this workout. If you use a Garmin watch and want to share a structured training with it, you have to set the Sport to Running or Cycling, even though you might be rowing. It’s a limitation on the side of Garmin.
- Session Type: You can have multiple types of sessions
- Training Session – regular training.
- Challenge – used to challenge to you exercise more than a defined number of meters, time, TSS points (rScore in rowsandall.com language) or TRIMP over a given time period.
- Mandatory Test – Are you expected to complete a 2K test next week? Do you have some flexibility as to the date of completion? Create a session that specifies the exact parameters of the test and the mandatory completion date or range of dates. You can only link one workout to sessions of this type.
- Total for a time period – similar to challenge, but instead of having to do at least so many meters, hours, etc, you have to do approximately so many meters, hours, etc.
- OTW time for a course – This allows you to row trials on the water. You have to attach the course to the session (see information on courses on this site), and your net time and distance covered over the course will be automatically calculated. The session is marked as completed if your on-the-water (OTW) row goes through the start and finish lines (and any intermediate waypoints if defined) of the selected course.
- Find fastest time for a given distance on the water – this is for OTW trials. If you set it to 2000m, for example, Rowsandall will automatically find the fastest 2K stretch in your session and report the time.
- Find largest distance over a given time on the water. Similar to the previous one, this setting finds the distance covered for a fixed time trial. For example, largest distance over 30 minutes.
- Session Mode: Distance, Time, rScore or TRIMP. If your session is to row 12km, use “Distance”. If your session is to row for an hour, use “Time”. Similarly for rScore and TRIMP.
- Criteria: For regular training sessions, use “Approximately” (recommended) or “At Least”. For trials and tests, use “Exactly”.
- Value: The session volume in meters (Distance), minutes (Time) or without units (rScore, TRIMP)
- Comment: Any other information about the session.
- Interval String: This gives you a quick way to describe the session using our “interval shorthand” explained here. For example: 4x2km/5min. Ignore this if you are not familiar with interval shorthand.
Create a library for your favorite sessions
Instead of creating new sessions from scratch or finding old sessions to clone, it is easy to store your favorite sessions in a template library. Over time, if you save your favorite sessions to the template library, you will build up your own collection of great training sessions, and it will become much more easy to build the training plan for the upcoming season.
Even better, you can decide to share your best sessions with all Rowsandall users, and you can browse those sessions that other users have made available. Of course, you have full control of which sessions you share, and which ones you want to keep private.

When you open a session that you like, you can see the “Save to Library” link near the top. After you have done that, click on “Session Library” in the left menu.
From this list, you can edit a template, copy it to your Plan as a scheduled planned session, and more. Notice that you can “share” the session, which makes it available to all Rowsandall users, and “lock” it, which makes it visible only to you.
Tags
When you edit a session template, you can add a list of tags.

For the example in the picture, I have added “1500m”, “intervals” and “threshold” to the list of tags. This makes it easier to search in the library when you’re looking for a certain type of session.
Steps
Instead of a free text description of a session, it is possible to add the formal description of each training step. Some smartwatches or training apps can then guide you through the steps while you are executing the session. For now, we allow export to Garmin smartwatches, but we are looking for ways to expand that to other devices and apps.
The template editor also allows you to edit the workout steps using a new step editor. This is a drag/drop editor that is not fully developed yet. It allows you to build up the session from pre-defined building blocks and looks roughly like this:
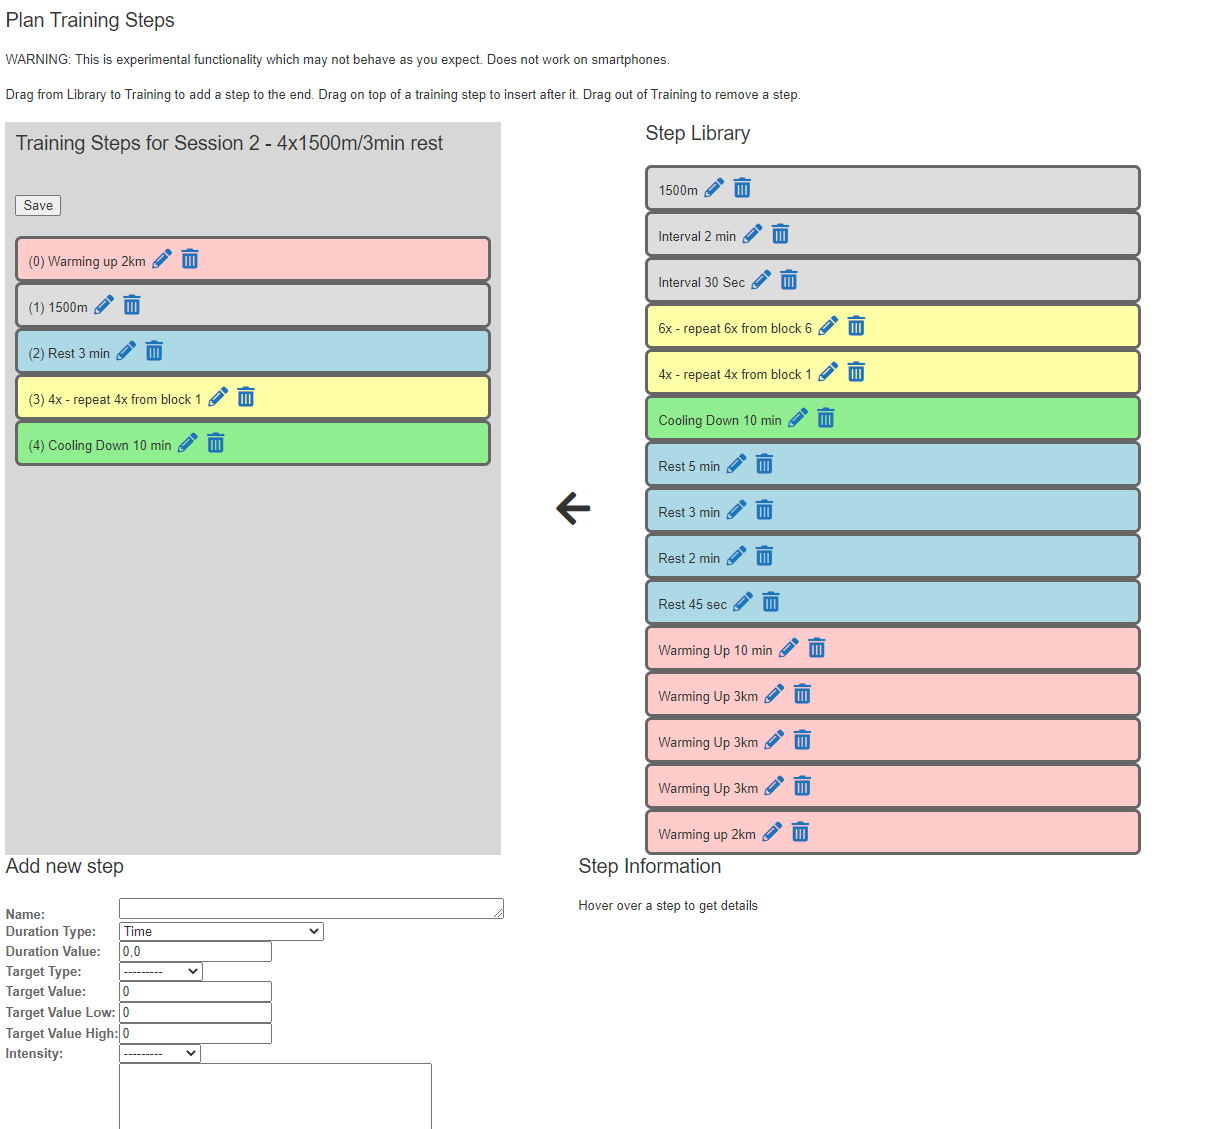
The idea is that you build the workout on the left (in the gray area) by dragging steps in and out of the grey drop zone.
Tracking Progress
![]()
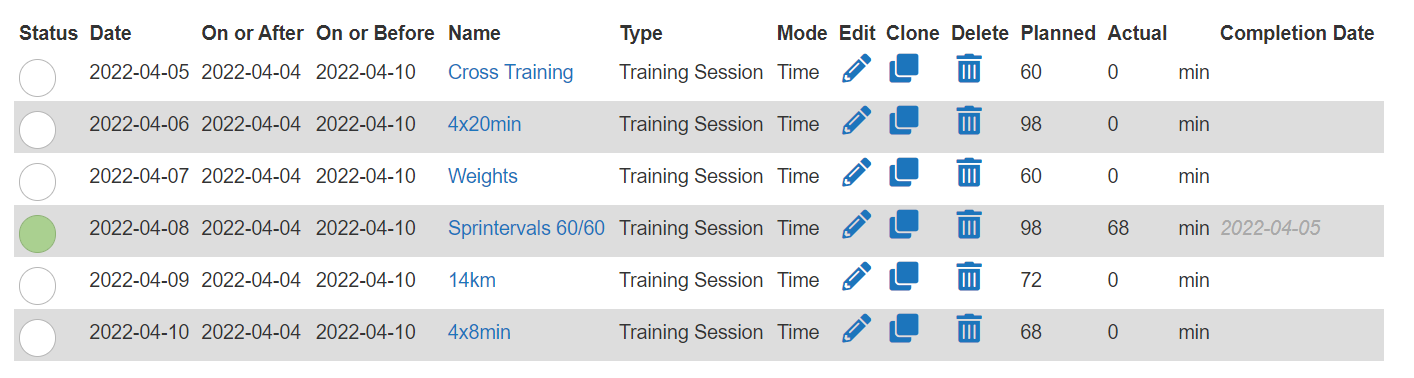
On the Plans page you can pick any date range to see planned sessions for that range. You will get a table of sessions with some information, as shown in the picture above.
- Colored circles indicating whether you did enough, less or more than was planned. A mouse hover over the circle tells you its status in words.
- You can also check the Planned/Actual/Completion date columns for a bit more information.
- By clicking on the circle, you are taken to a page where you can “link” workouts to the session.
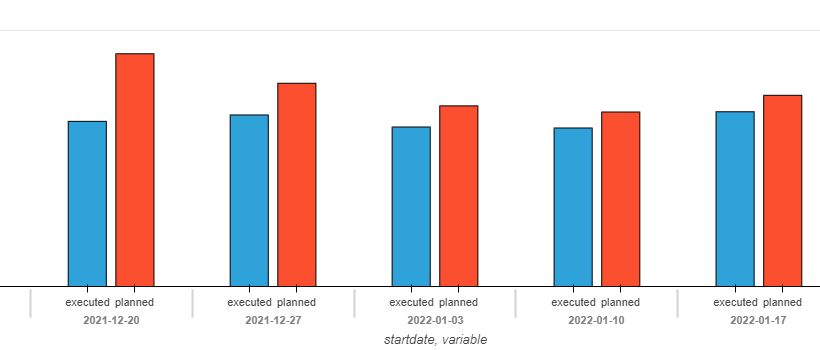
If you want to take a step back, there is also a link to the “Actual vs Plan Chart” at the bottom of the Plan page. There, you can get a graphical representation of how you performed (blue) vs the plan (red), with each bar representing a training period of a week. This gives good information. Sometimes, a plan is too ambitious or life gets in the way. Sometimes, we do much more than planned, which might lead to overreach and injuries.

Summary
By following the instructions in this article, you will be able to plan out your training plan on Rowsandall.com, track execution of the plan, and save your favorite sessions to a template library, from where you can easily use them in your next season’s planning.