
Contents
Why coach rowing with data?
Are you a rowing or indoor rowing coach with remote athletes? Or are you an athlete who is using the services of a remote coach? Here is why you should start using data and rowsandall.com to speed up your progress.
Why row with data? Getting better is about planning, executing, measuring and adapting. At a beginner’s level, any exercise will improve your fitness, but once you have reached a certain level and are training to be competitive, you need to plan carefully, make sure that you are not over or undertraining, make sure you are improving the right aspects of your fitness (sprint vs endurance), and make sure you are in your top form on race day.
So you use the services of a remote coach, who creates a training plan for you.
You execute the plan.
It sounds simple, but there are a few questions:
- How does the remote coach know that he is addressing your weaknesses?
- How does the remote coach know that the training intensity and volume are appropriate to your current level of fitness?
- Once you are executing the plan, how does the remote coach monitor your progress? Do you send him emails with screenshots or ergometer scores? How do you do that with your OTW rows?
- How do we decide that the plan was effective?
Your coach will have more questions, especially when she is coaching a large group of athletes. Here is what is in the mind of the remote coach:
- How do I keep track of the training plans for all my athletes?
- How do I get the training plan to my athletes?
- How do I know they did the sessions? Did they miss some sessions? Did they do extra workouts to try and catch up?
- What do I know about the execution quality?
- What do I know about their technique? I can see some improvement on that video they sent in, but are the data confirming a trend, or was he just trying his best when the video was taken?
This is why there is a need for using a data platform to manage your plan, sessions, athletes, and their execution.
Currently, there are many options to capture indoor and on-the-water rowing, and there are a few options to manage these data on-line, so there is really no need to work with photos of ergometer screens or manage your athletes in Excel.
With the cloud solutions available, you have the possibility to manage your athletes anywhere, any time, and on any device, as long as you are connected to the internet.
One of those cloud rowing data solutions is rowsandall.com. The key advantages of rowsandall.com are:
- Free data and analysis for rowers, by rowers. We understand rowing and build useful data visualization tools. The free basic plan already allows you to deep dive into individual strokes, pieces, and workouts. Your athletes will love to look at their workout results and ask you questions based on their data.
- A strong track record of fast development. New features are added every month. When you feel something is missing, a simple email to Sander or a post on the Rowing Data Analytics Facebook group is sufficient to get the discussion started. Many of rowsandall.com’s features have started as an idea by a user.
- Integrated with Strava, Concept2 logbook, SportTracks, TrainingPeaks and other popular data platforms. Your athletes can easily share their results on these sites, as well as Facebook and Twitter.
- Supports all major rowing apps and electronics. You can manage athletes who use BoatCoach, CrewNerd, NK SpeedCoach owners, rowers using NK Empower Oarlocks, Quiske pods, and more … Don’t force your athletes to spend money to replace apps they are already using.
- The most complete data set on the market. Rowsandall.com allows you to dive into the details of sessions, as deep as you want, supporting more rowing related metrics than any other tool. Don’t limit yourself to only pace and stroke rate. Look at power, peak and average force, stroke length, and more, and use advanced analytics tools like Box Plots to monitor progress.
This blog post explains how a remote coach can use rowsandall.com to check in on his athletes.
Managing Athletes and Teams on rowsandall.com
Getting Started
- Surf to https://rowsandall.com/rowers/promembership and select one of the three Coach memberships (up to 4 athletes, 4-10 athletes, more than 10 athletes) on the right-hand side. You can pay for a recurring subscription or chose the one-time payment, which is valid for a year.
- It may take a few hours to upgrade your membership. Once we have processed your payment, you will notice that your membership plan has changed. On the top right of the rowsandall.com page, you will see that your avatar has changed to the “Coach” variant:
![]() As soon as you have been upgraded, do the following steps, which will be detailed in the sections below:
As soon as you have been upgraded, do the following steps, which will be detailed in the sections below:
- Establish your first team
- Invite people to your first team
Establishing a team
On rowsandall.com, the way to access and manage the performance of your athletes is through teams. The team functionality allows you to invite people to become your athletes, remove them when you are no longer coaching them, and access their workouts and training plan. Similarly, your athlete can ask to join one of your teams, or decide to leave if they are part of one of your teams.
Before I show you how to establish a team, here are some examples how to use teams to organize your coaching. You can create as many teams as you want and you can have one rower in more than one team. It is up to you how you organize this, but the following are models that have been successfully applied:
- A remote coach managing a Masters group at one club establishes a team named “RC Happy Scullers Masters Men” (example) and manages all rowers of that club in this team. He sets the team to “open” so new people joining the training group can see the team and ask to join. He sets the sharing property to “All Members” so that rowers can see each other’s workouts.
- A remote coach managing a large group of unrelated individual rowers world-wide. She created one Team called “My Rowers” and set the team to “closed”, so that the admission to the team is by invitation only. Also, she set the sharing property to “Coach Only”, so that team members cannot see each other’s workouts. The team can see who else is being coached by her.
- Another remote coach managing a large group of rowers has chosen to create a team for each individual he is coaching. In this way, each athlete lives in his own world and doesn’t know anything about the others.
- This is not strictly remote coaching, but a coach at a Student rowing club has created one team for each “boat”, so he has a “Crew A”, “Crew B” and “Crew C” team. When he decides to change the crews, he moves members around between the teams.
It is recommended that you do some thinking beforehand to decide how to organize your rowers in teams. Once you’ve done that, you’re ready to establish a team. Head over to this page, which will look somewhat like the picture below. You can always navigate to this page by selecting “Teams” in the top navigation bar.
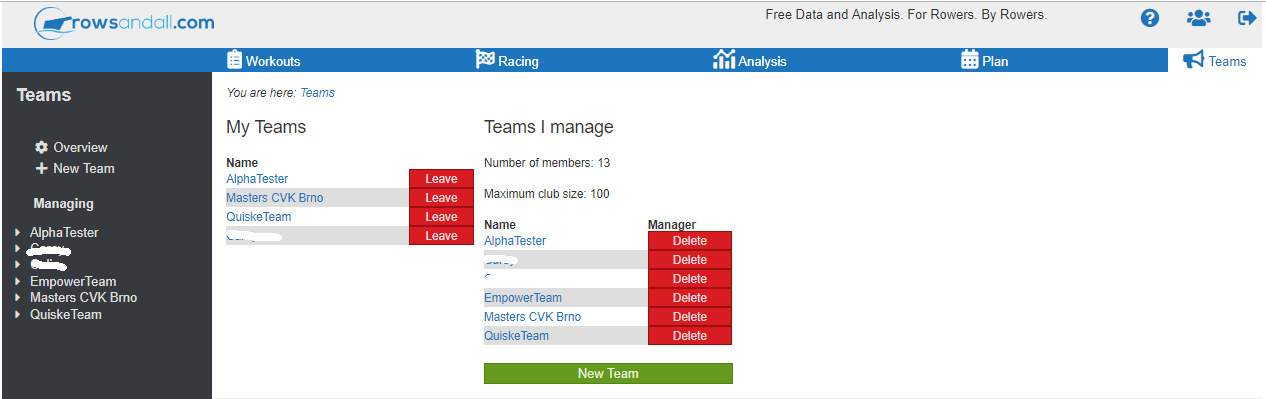
There is a lot going on on this page, but most of it is self explanatory. Here’s what the different sections do:
- The “My Teams” section in the top left lists all teams I am a member of. As a coach, I am also a rower in some of my own teams. This may not be the case for you, but your athletes will see this part. By clicking on the team name, you will be taken to a page with detailed info about the team, which I will describe below. The big red “Leave” button does what it says. You leave the team as a member. If you are the team manager, you will of course keep the management functionality.
- The “Teams I manage” section lists all the teams I am the manager of. It also tells me that I currently have 13 members in my teams and I have a maximum of 100 members. This maximum will be set to the appropriate size according to your paid plan. Clicking on the team name will bring you to the team page that will be discussed below. The big red Delete button does what it promises. It brings you to a confirmation page, where you confirm that you really wanted to delete the team. Deleting a team will not remove the users or their workouts.
- The “New Team” button allowing you to create a new team. Initially, this is the only button you see on this page.
- Invitations and Requests. This section lists open invites to join a team. Here, you can accept or reject invites to you, and revoke your invites to other members.
Teams and Privacy
It is important to point out that by establishing a team, you are enabling sharing of personal data between users of rowsandall.com. According to EU regulations on data privacy, and the rowsandall.com privacy policy, we need to record a positive opt-in for team membership. This is the reason why your athletes must accept the invitation to join a team and why they can leave a team at any time, making their data instantly invisible to you.
Create a New Team
By clicking on the New Team button, you are taken to a form where you can create a new team. The page looks like this: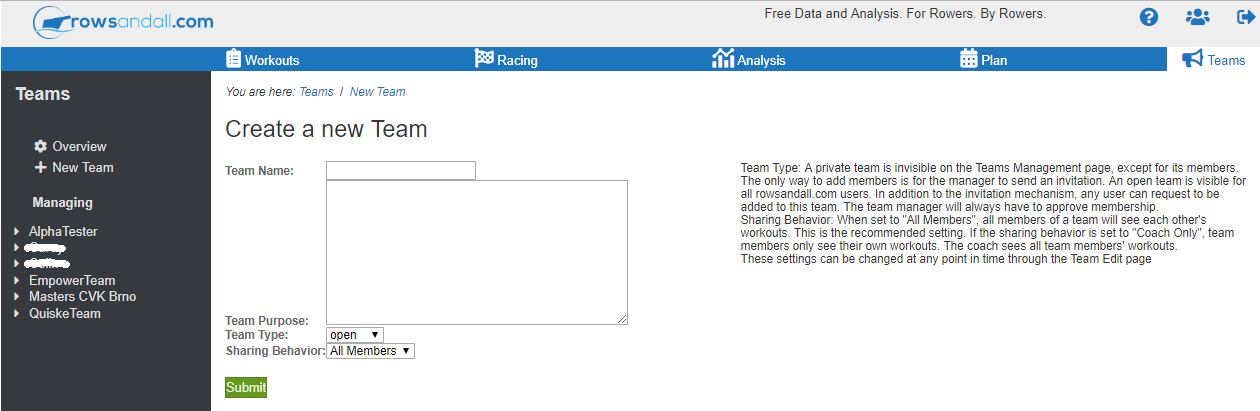
- Team Name: This is the name you give to the team.
- Team Purpose: Here, you write who the team is for and what the team wants to achieve. It is up to you to decide what you put here, but if you make the team type “open”, the team name and purpose are what interested users see.
- Team Type: You can chose “open” or “private”. A private team is invisible on the Teams Management page, except for its members. The only way to add members is for the manager to send an invitation. An open team is visible for all rowsandall.com users. In addition to the invitation mechanism, any user can request to be added to this team. The team manager will always have to approve membership.
- Sharing behavior: You have two options, “All Members” and “Coach Only”. When set to “All Members”, all members of a team will see each other’s workouts. This is the recommended setting. If the sharing behavior is set to “Coach Only”, team members only see their own workouts. The coach sees all team members’ workouts.
As it says on the page, you can always change this behavior in after the team is established. However, if changing the sharing behavior and team type, note that you have the duty to inform your team members per the privacy policy.
Once you hit “Submit”, the team is created and you will be redirected to the Team Management page, where you will see your new team.
Inviting Team Members
Once you have established the team, it is time to invite your athletes. Click on the team name from the Team Management page to get to the team page. As you are the manager, you get the invitation functionality on the right-hand side of this page:
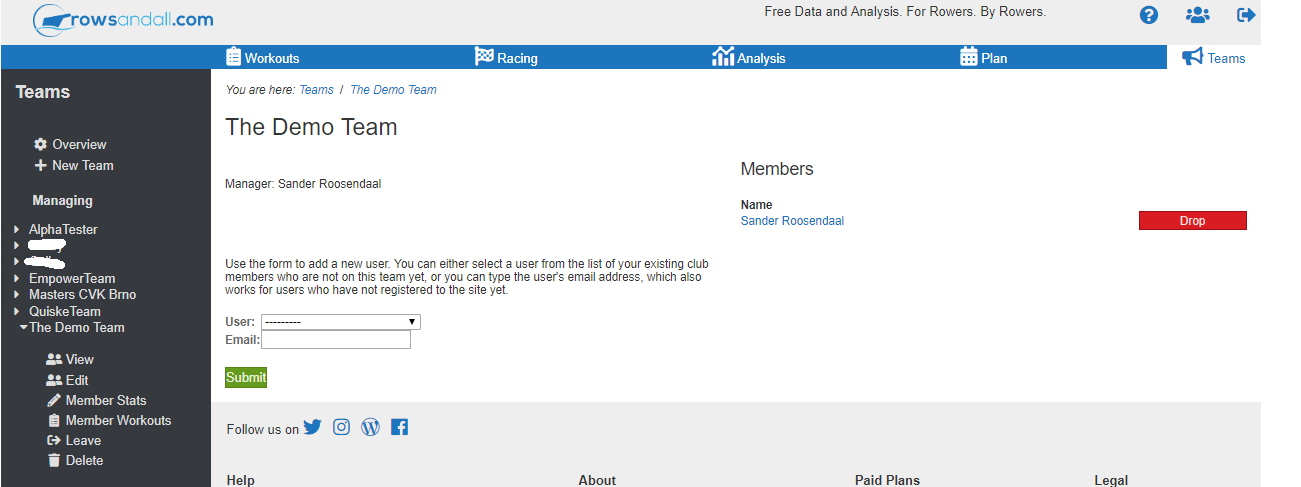 The left-hand side of this page shows the team name, team purpose and the name of the team manager (me, in this case). Regular team members will have the red “Leave this team” button. As the team manager, I also have red “Drop” buttons after each member in the members list. With this button, you remove the person from your team. They will keep their data, but will not be part of the team, and you lose access to their data.
To add a new member, you use the form. If you already have other teams, there is a handy drop down menu under “User” that allows you to quickly select one of your members on another team. For entirely new people, you fill in their email address on the “Email” field.
If the person is already on rowsandall.com, he will get an invite on his Team Management page. For any member you invite, an email will be sent to the new member with detailed instructions on how to become a member of your team and a description of what team membership encompasses. The potential member can of course also reject the invite. Once a potential member rejects or accepts the invite, you will get a notification per email.
At the end of this process, you should have your team(s) established and populated with your athletes, who are eager to listen to your guidance.
Working with teams
Now that we have a team established and we have team members, it is time to get down to the coaching business. As a remote coach, you will want to review workouts that people have been doing in relation to a training plan that you have communicated to them. Rowsandall.com allows you to do all that online. You can set up training sessions (see below) and review the sessions that people have done.
Uploading workouts on behalf of your members
Sometimes your team members have their own rowing electronics and send their workouts to rowsandall.com by themselves. Sometimes, they just hand you a bunch of SpeedCoaches or they send you the file per email. Now it’s up to you. Luckily, with the Coach plan, you can add workouts to your team members’ accounts. The special upload page is a link on the regular upload page.
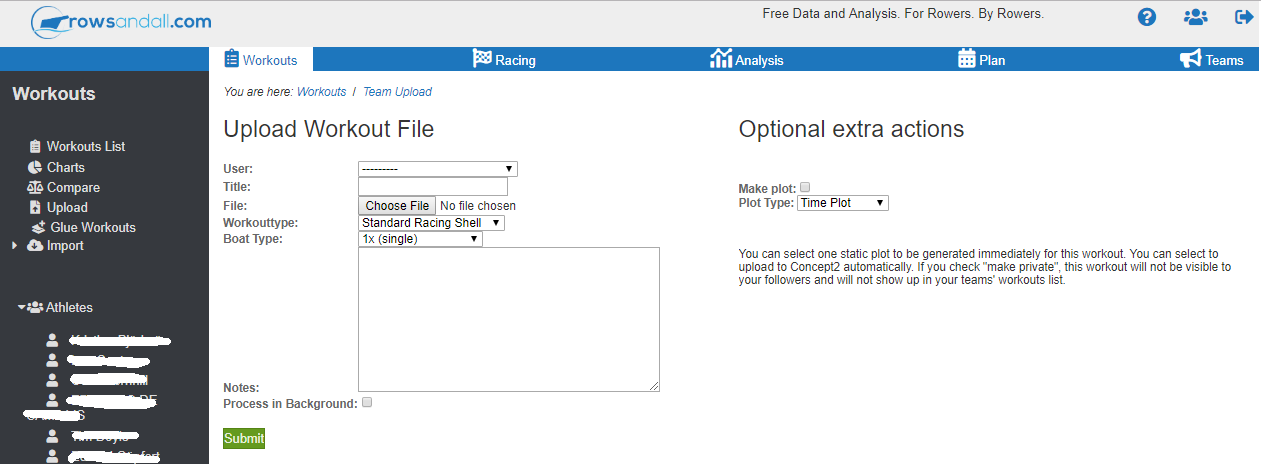 As you can see, this page is almost identical to the regular upload page, except that you have to select a user. Uploading a workout through this page doesn’t load that workout directly. Anticipating that you have a whole bunch of lazy rowers, you remain on the upload page so that you can upload the next person’s workout.
Viewing workouts
Viewing workouts works in much the same way as if you were an individual user. Go to Workouts through the navigation bar on the top of the page and you will see your own workouts. However, note that now you are a coach and you can change to view the workouts of a different rower. See the image below. Click on “Athletes” in the left context menu and you will see a menu of all the athletes you have in your teams. Select one of the athletes to see the workouts of that person.
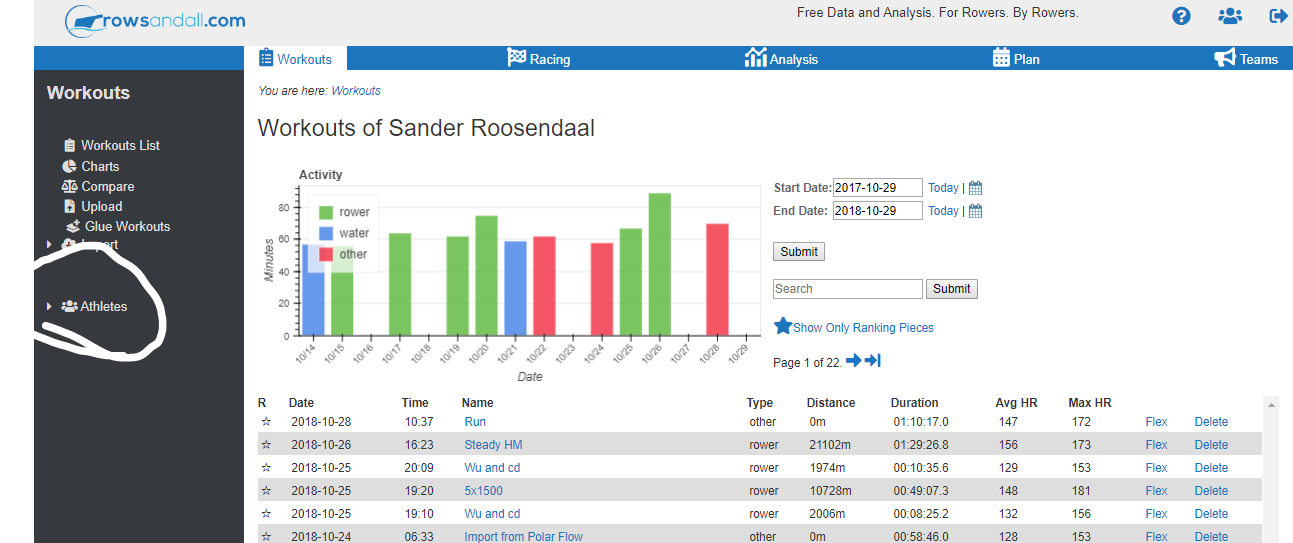
Here, you can open any workout, create charts, and look at Flex charts or statistics. If you want to see all workouts of all members of a specific team in one list, you can do that through the Teams top navigation menu. Then select a team in the context menu and find the link to “Team Workouts”.
Commenting on Workouts

One of the nice things to do when reviewing your athlete’s workouts is to leave comments. On the Workout View, Workout Edit View and Workout Workflow View (if you have configured it so), there is a little link to a “Comments” page, which looks like the image above. This is a simple “chat” functionality, where you type your comments in the box, and it gets added as a comment to the list of comments. At the same time, your athlete gets the comment in his email inbox.
This is a handy way to discuss aspects of the workout, as the athlete will have everything in one place.
Analysis
All Analysis functions have an additional “Select Rower” button when you’re on the Coach plan:
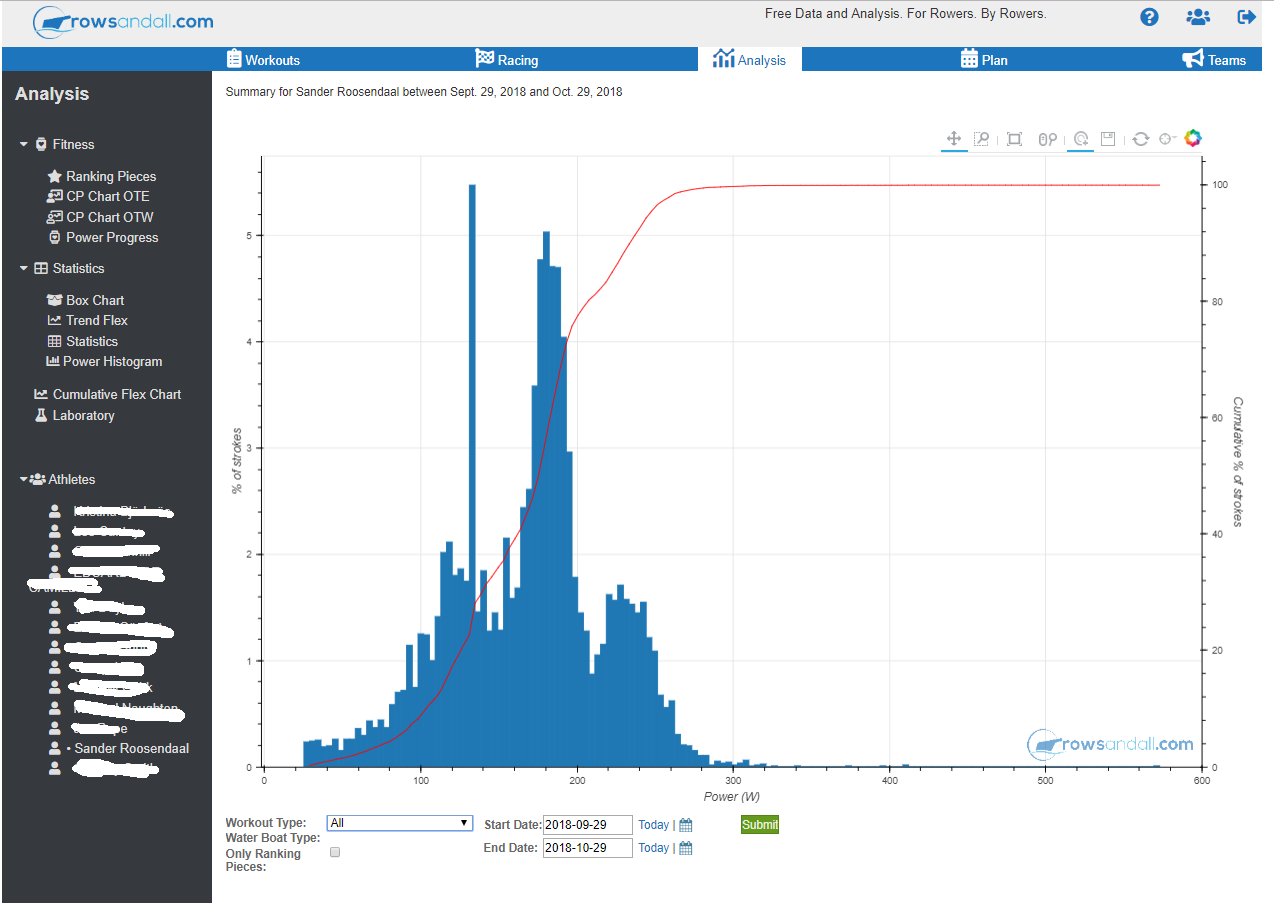
It’s the green button in the top right of the image. The only exception is Multi Compare. If you navigate to it from any place other than a Team’s page, you will only see your own workouts. To compare Johnny’s workout with Wally’s, you have to first select the team that has both Johnny and Wally as members, from the Teams menu. Then, you select “Multi Compare” directly from the team page.
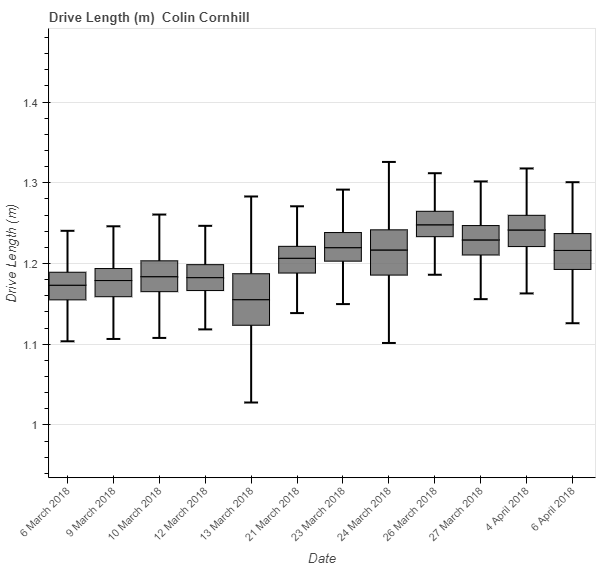
Pro Tip
I have very successfully used the Box Chart to monitor stroke metrics that my athletes need to focus on. One person has to learn to row consistently, and I have been monitoring the box chart for Work per Stroke, looking at a few weeks of training, and can see immediately on which day he was focused. Another person may have a problem with washing out, so if she uses an Empower Oarlock, you can monitor Wash in a Box Chart.
Training plans – The Planned Session functionality
As a coach you have at your disposal functionality to program the training plan for your different teams on the site. This makes it easy for your athletes to see what’s up, and as they upload their workouts and match them to the sessions, they will see their progress on the plan, which will give them a little motivation to complete the sessions. The functionality lives under “Plans”.
Clicking on the Plans button will take you to the Plan Overview page where you will see the sessions that have created for yourself. Again, you can use the athlete selector menu on the left to switch to each of your athletes. That same menu also has a time selector. The overview page will display only the sessions it finds that have been scheduled to occur during the specified period. The default is This Week.
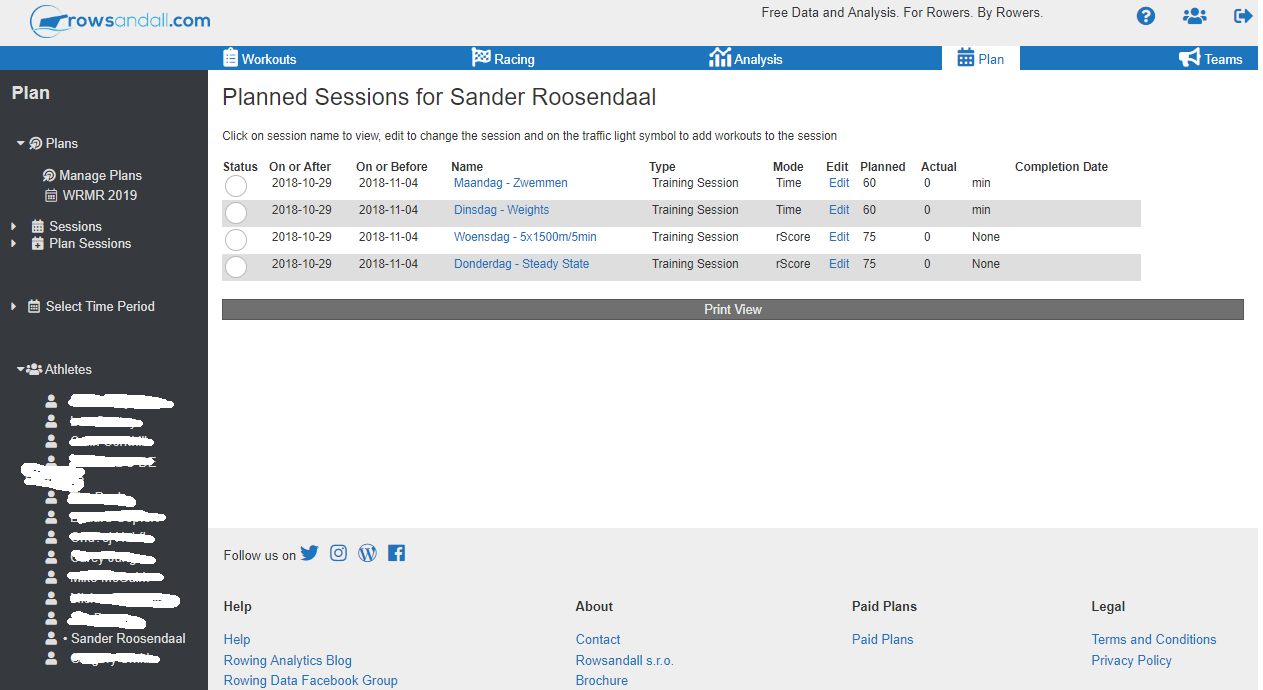
Notice the other blue buttons in the secondary menu: Plan Overview (the page that we are currently on), Link to Workouts, and Add Session. A session is a container which will define a goal and to which you will attach or link the workout/s that you do to complete that goal. We’ll talk about the grey “Plan Complete MicroCycle” and Courses buttons later.
Your athletes have access to this exact same page, except that they cannot select the plans of other athletes. Also, if they are on regular Basic or Pro plans, they cannot create planned sessions.
The session data that is displayed in the list is self-explanatory except, perhaps, for the Stop Light. As the title suggests, the color of the stop light gives you (and your athletes) a quick, at-a-glance view of how they are doing on the displayed sessions. The green light tells you that all is well. The athlete has completed that session successfully. The orange light says she has partially completed the requirements of the session or exceeded the requirements. Note that exceeding the requirements is not always a good thing as it may impact their performance tomorrow. Clicking on the light will take you to the Manage Plan Execution page where you can see a list of workouts completed during the Time Period selected including which one/s have been linked to the session.
Clicking on the session Name will take you to a page that displays everything you ever wanted to know about that session including linked workouts, the parameters of the session and your execution progress.
Clicking on Edit in the session description will take you to a page where you can edit the parameters used for the session.
Below the session data, you may see (if there are any) a list of unlinked workouts under the heading “Workouts that are not linked to any session”.
Create a Session
Click the Add Session menu item and you will see this page:
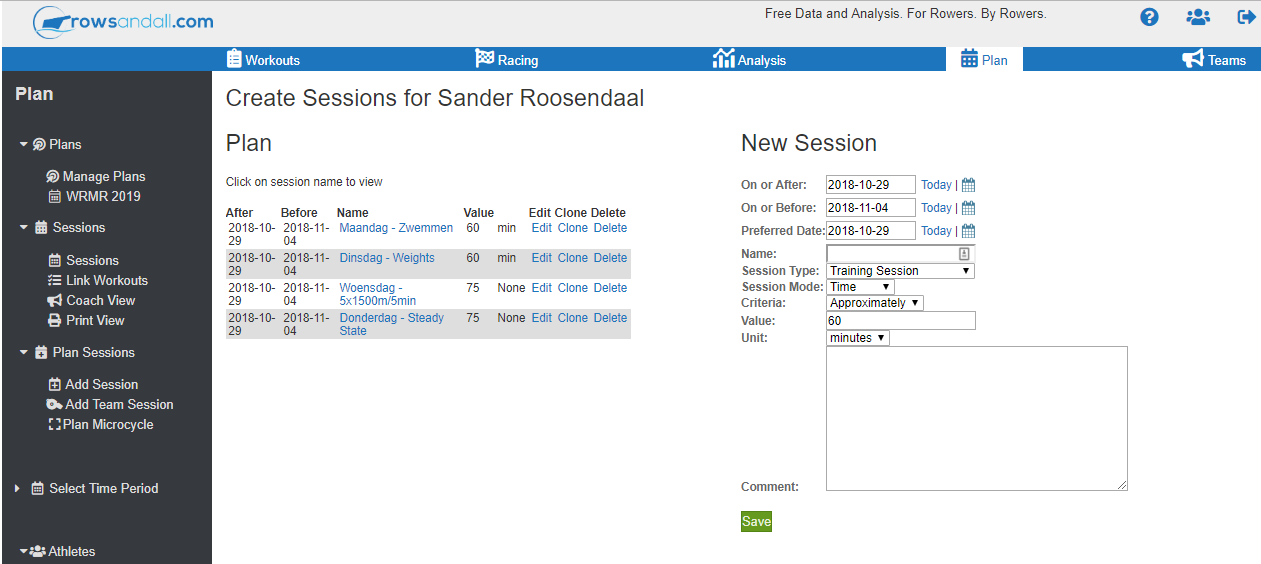
On the left is a list of any sessions that you have already created for the selected athlete. Again, you canuse the green button to switch to another athlete. If you don’t see all sessions, check the Time Period that is selected (This Week is the default). You may need to select a different time period to display the missing sessions. On the right is the form where you will create your new session for the given athlete.
Notice in the session list on the left, the Edit, Clone and Delete links in the description of each session. If you want to create a new session like one already in the list, select Clone. Your new session will be created without having to use the form on the right and the dates for the new session will be advanced appropriately, e.g. in the example above, if you clone “1hr SWIM”, you will get a new session “1hr SWIM (copy)” with the dates adjusted. You can then edit the name and any other parameters that you wish by clicking Edit in the session name field. To get rid of it or any of the other sessions in the list, click Delete.
Dates
Although a session could be a single day, more than likely, you will define a range of dates for the session to give your athletes some flexibility in completing it.
Name/Type
Give the session a Name and select a Type from the drop-down list. The options are:
- Training Session: generally used for a specific workout such as 8x500m. The session will be listed as complete when you do that workout and link it to the session.
- Cycle Target: used to define a session during which your goal, over a period of time or cycle, is to complete a defined number of meters, time, TSS points (rScore in rowsandall.com language) or TRIMP. For example: during a one-week micro-cycle, you might set a goal of accumulating 8:00 hours of training or 50K or 350 rScore points. Your progress will be tracked as you link workouts to the session and will be listed as complete when you are within 92% and 108% of the target.
- Mandatory Test: Are you expecting your athlete to complete a 2K test next week? Do you have some flexibility as to the date of completion? Create a session that specifies the exact parameters of the test and the mandatory completion date or range of dates. You can only link one workout to sessions of this type.
- OTW Test over a Course: This allows your athletes to row trials on the water. You have to attach the course to the session (see the section on courses below), and your net time and distance covered over the course will be automatically calculated. The session is marked as completed if your on-the-water (OTW) row goes through the start and finish lines (and any intermediate waypoints if defined) of the selected course. If you assign this type of session to multiple athletes who row on the same body of water, you will also get a ranking by net time over the course, so you can immediately compare the rowers. As if you spent the afternoon on the bank with a stop watch, except that your athletes might be rowing in Washington DC while you are in California.
- Challenge: A challenge is similar to a Cycle Target in that it is designed to be completed over several days and your progress will be tracked as you link workouts to the session. In contrast to a Cycle Target, the session is marked as completed when you achieve more than 100% of the target.
Session Mode
The mode that you select here will define the metric that is used to measure your progress/completion of the session.
- Distance: For sessions defined by meters, e.g. a 10k Training Session or a Cycle Target session with a 50K target.
- Time: For sessions defined by time, e.g. a Challenge session requiring 10 hours of training between two dates or a Mandatory Test for a 20’ FTP test.
- rScore/TRIMP: For any session in which the goal is a certain level of training load, usually over a period of time, e.g. a week. Training load incorporates both workout duration and intensity and is often used in place of one-dimensional workouts defined by distance or time alone.
Pro Tip
What mode should you select for an interval session with a distance interval and a time based rest period? Here, you would have to estimate the duration of or distance covered during the session. Use the “approximate” criteria (see next section) to make sure you get credits for this session, if you are close to the target.
Criteria
Having defined the session mode, now you will set the criteria by which that mode will be evaluated. Do you want the Cycle Target session of 85 rScore points to be “at least” 85, “approximately” 85 or exactly 85? Your selection will determine how progress is evaluated and the color of the stop light on the Overview page.
Best practices:
- Use “approximate” for all training sessions and cycle target sessions
- Use exactly for a test (like a 6k trial or a 30 minute trial)
- Use the criteria that helps you get motivated to complete the session. For some, “at least” works better than “approximately”.
- If you have a power meter, try to switch to rScore (TSS) based sessions. They better reflect your training load.
- If you are training with heart rate but do not have a power meter on the water, try to switch to TRIMP. This reflects better the training impact.
Value/Units
Here you will set the target time or distance for the session mode you have chosen, and the selection will be automatically pre-filled based on the session mode. If you have set the mode to time, set a goal in minutes, e.g. the workout is a 2K test and your target is 7 minutes or you are going to do a 30’ test with a goal of 8000 meters. If your session mode is rScore or TRIMP, select your goal number and units of None. When you change the unit, the session mode will be changed automatically to match the unit.
Save
When you have created your session, click the Save button and it will be added to the list on the left.
But I am not seeing the session I just created?
If the workout you just created is outside the Time Period selected in the blue button just above the New Session form, it will not show up in the list. For example, if you have This Week selected and create a session for next week, it will not show up in the list. Change the Time Period to the appropriate setting and … there it is!
Link Workouts to a Session
Click the Link to Workouts button (or the stop light icon) and you will be taken to the Manage Plan Execution page, again with the option to switch rower:
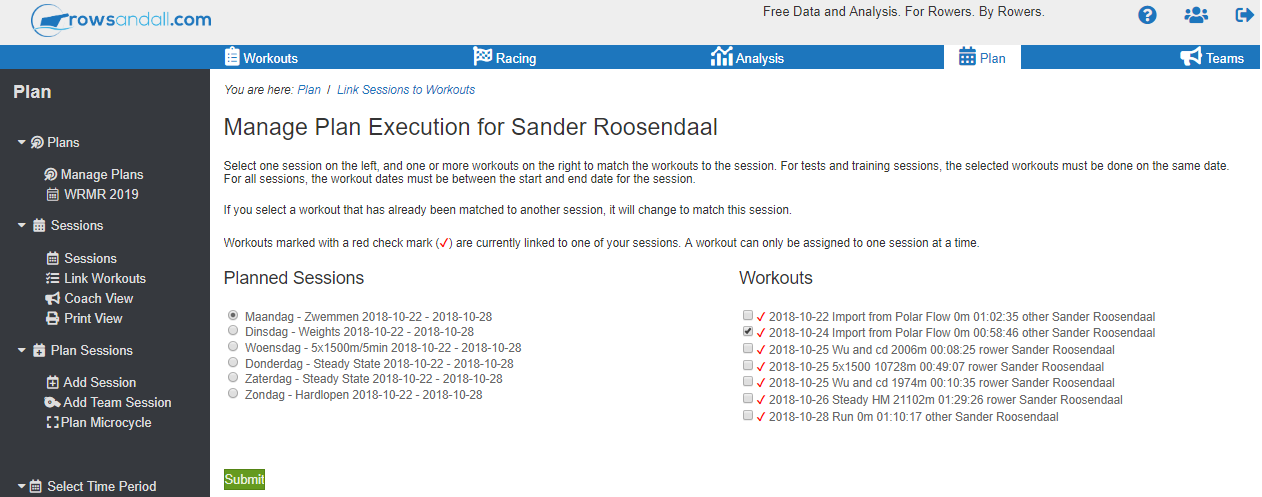
The left part of the page lists the planned sessions for the selected time period. One of the sessions will be preselected, but you can switch to another one.
On the right side of the page is a list of workouts that are eligible to be linked to this Test since they were completed during the time period of the Test. To link one or more workouts to the session, click the check box.
What do the red check marks signify? The workouts showing the red check marks have already been linked to some other session. You can still link them to the current session if you want but the workout/s you select will be de-linked from the other session.
When you have finished selecting linked workouts, click the Submit button to save your selections. You will then be returned to this page and can select a different session from the list on the left and link workouts to that session.
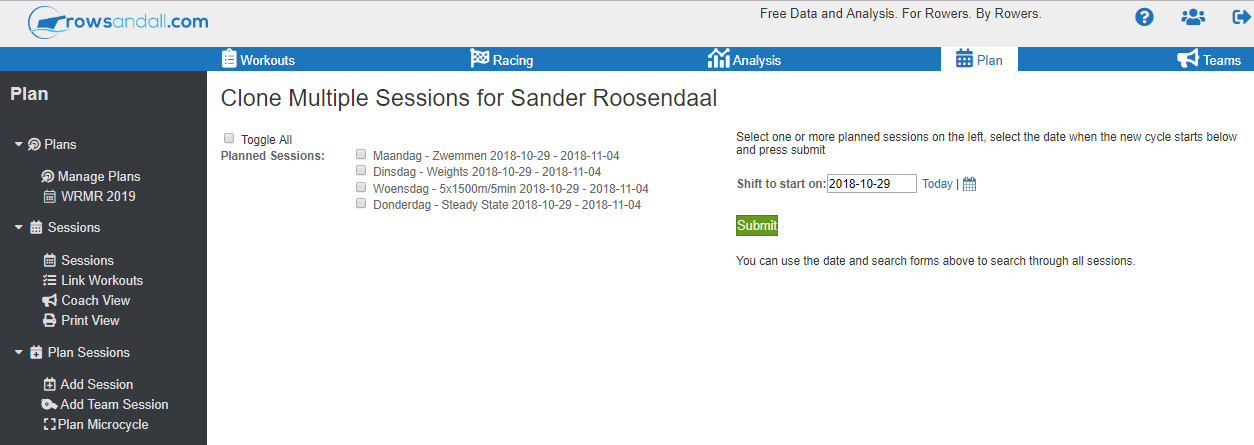
Plan a Complete MicroCycle
This button brings you to a page where you can create, modify or delete your athlete’s sessions in bulk, i.e. an editable list of all your sessions for the time period specified in spreadsheet form.

To add a single new session, click Add More then edit the parameters and Submit.
To clone one or more sessions, click the Clone Multiple Sessions button. You will be taken to this page where you can select the session or sessions that you want to clone and a date on which you want the new sessions to start. Clicking submit will save the new sessions and take you back to the previous page where you can make additional edits.
You will see this page:
Create and Edit Team Session
When you are managing individual rowers as a remote coach, you will probably plan an individual training plan for each athlete separately. However, if some of them are members of a training group, it is easy to organize them in a team (see above how to do that) and plan joint training sessions in one go. Click on the “Add Team Session” button to open this page:
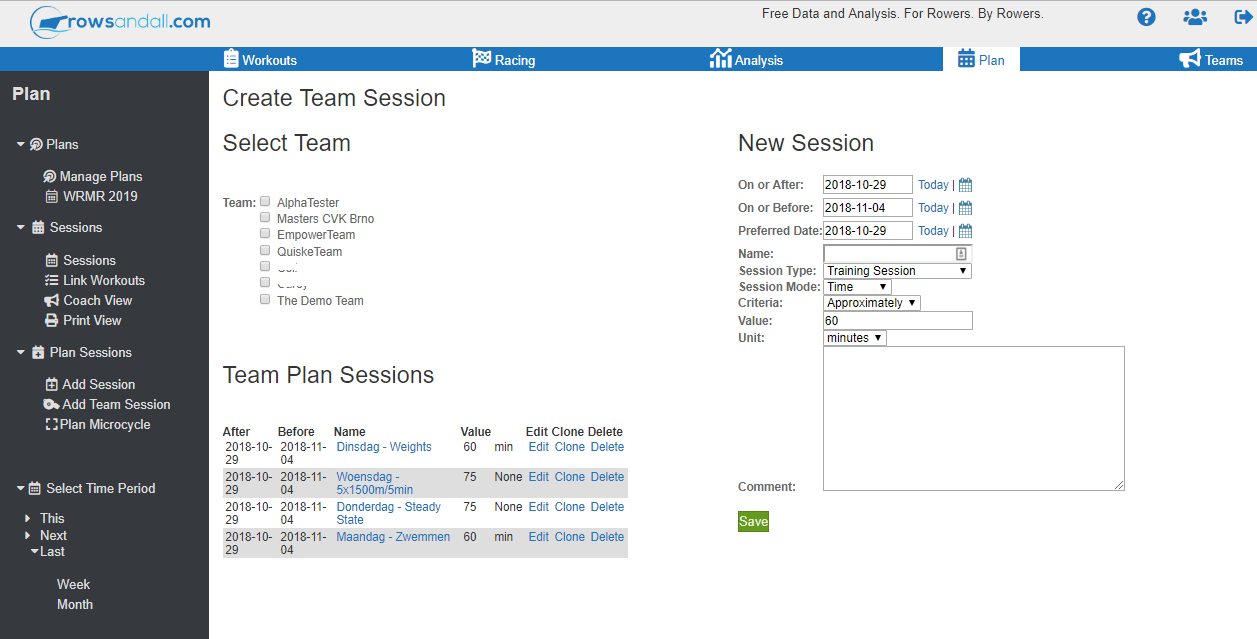
This works exactly as adding a planned session for one athlete, except that you can select one or more teams on the left. The session will be added to the plan for each of the athletes in the selected team or teams.
When you open a team session for editing, you see the following page:
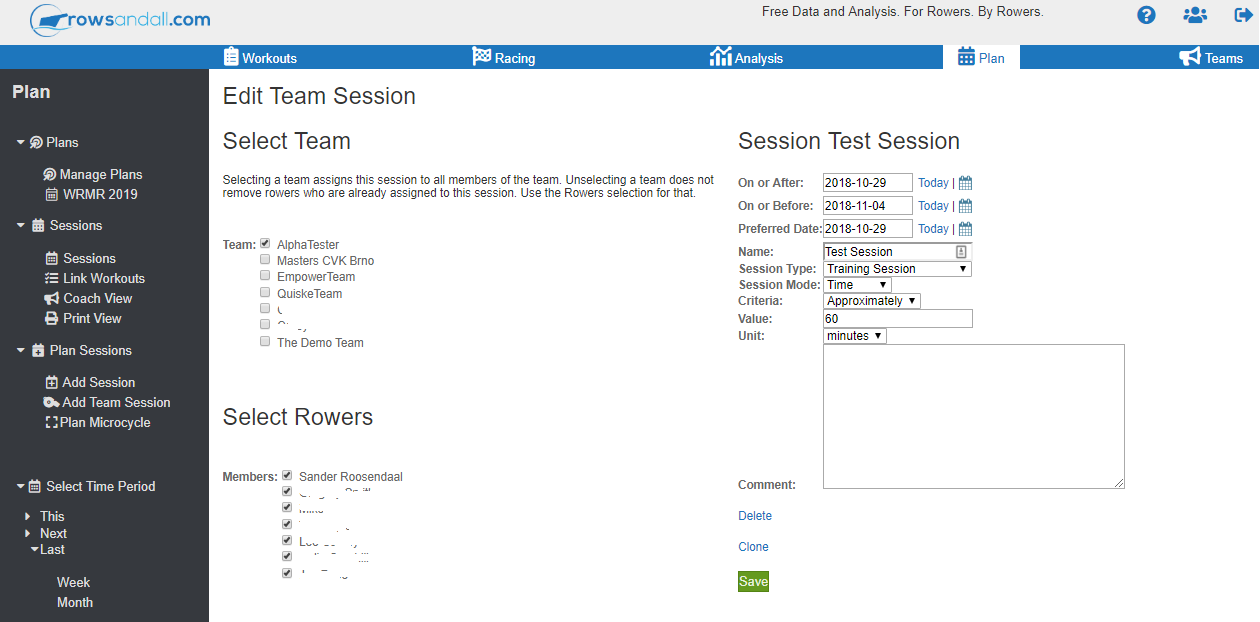
This form has both a Team part and an Individual Rowers part, listing all rowers in all selected teams. When you create a Team session, it gets tagged with the name of that team, but it also assigned to each of your athletes.
It is important to note a few things here. Because there are potential conflicts between the Team check boxes and the individual members check boxes, there are a few things to keep in mind:
- If you untick a selected team, the session is not removed for the individual rowers, allowing you to make separate choices for each of the team members on the members part of the form.
- If you want to remove the session for only a few of the team members, you will have to uncheck their Team, then uncheck the rowers who should not receive the session.
- If you check a team, the session is added for all rowers in the team. If you want to add only a few members of a team, add the team, hit Save, then remove the team, and edit the Members part of the form.
It is clear that the best use of a Team session is to use it for sessions to be done by all members of a team.
Coach Overview
Clicking on Coach Overview gives you a neat overview of how all your athletes are doing on the sessions that you have scheduled for them.

Note that in this example, the two athletes don’t have any common sessions. If there are common sessions, they are listed on the same line, of course. With the green button you can select to view sessions for a single team only. This is a great way to get a quick overview of how your athletes are doing.
Courses
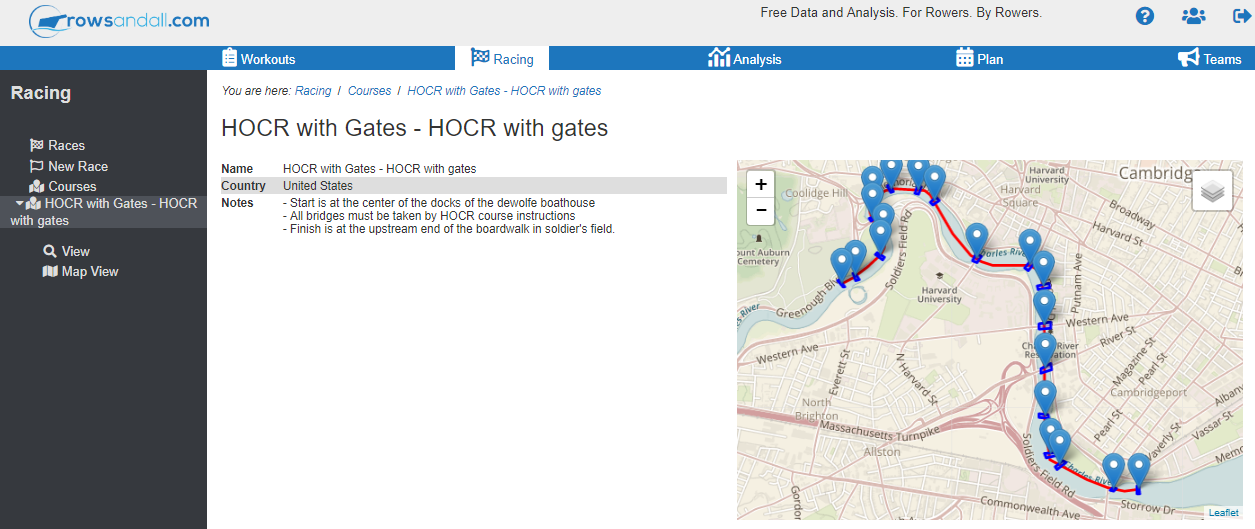
Previously we talked about a session type called OTW Test Over a Course. Courses are defined by a Start box or polygon, a Finish polygon and, if desired, turn points (a bend in the river or a buoy around which you must pass). You will need to have a copy of Google Earth available to define the polygons and save the course as a KML file. Here is an example of a course on rowsandall.com, showing a start polygon, finish polygon and two “turn” polygons.
After creating the KML file, click on the Courses button. You will be taken to a page where you will see a list of currently available courses and instructions on how to create a new course.
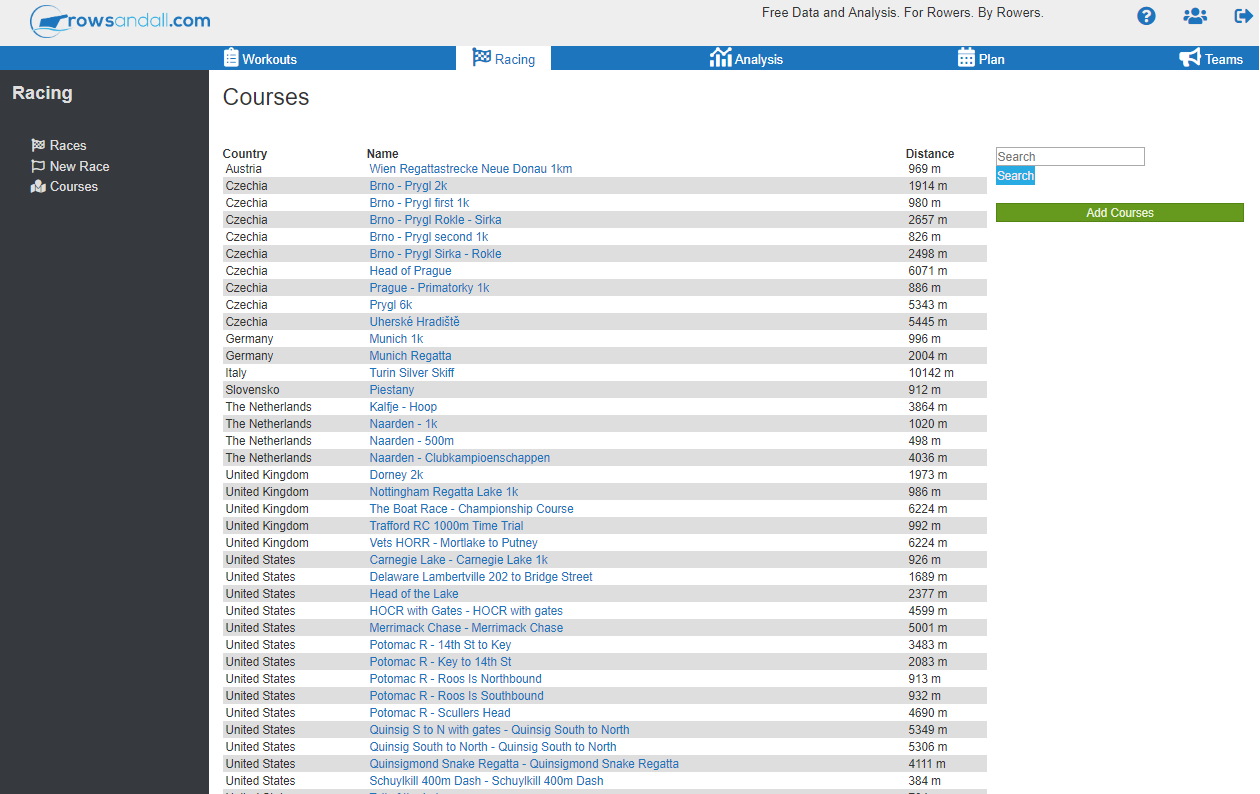
On this page, click Add Courses and you will be taken to a familiar looking page where you can upload the KML file. Give the course a name and add details in the Notes section. Whatever name you gave the course in Google Earth will be appended to the Name when it is processed by Rowsandall, e.g. Name: “Potomac R”, Google Earth: “Key to 14th St” gets processed to Potomac R – Key to 14th St.
Rowsandall will also look at your course and try to ascertain the Country where the course is located. If you do not see a Country listed for your course, you can add it by clicking on the name and editing the information. Country information will be helpful to other users who may want to use your course.
A few tips when defining Courses in Google Earth:
- Define the start polygon in such a way that your start line is the line through which you leave this polygon when you are starting.
- Define the finish polygon in such a way that your finish line is the line through which you enter this polygon
- To acknowledge that a rower has rowed the course, there must be at least one stroke recorded inside each polygon, in the right order. The order of your intermediate (“buoy”) polygons is important!
Summary
This tutorial is for remote coaches using Rowsandall.com and describes how to establish and populate teams, and the creation and use of Sessions to plan a schedule of workouts to be executed over a period of time or cycle. We define, among other things, the Type of sessions that are available, the Criteria by which they will be evaluated and the methodology used to report execution progress.
After your athletes do their workout, you can review and analyze them just as you would analyze your own.
If you have any comments about the content of this tutorial or questions about the Coach module, address them to support@rowsandall.com or post on our Facebook group Rowing Data Analytics (https://www.facebook.com/groups/rowsandall/).